Composting With Worms
Using worms to create compost is called vermiculture or vermicomposting. Red worms and manure worms are most efficient when it comes to decomposing organic material—especially table scraps. The difficulty is that these worms need cool temperatures all year long. Add a handful of them to an hot compost pile and they'll be dead in an hour.
Given the proper environment, red worms will go to work to digest the table
scraps quicker than any other compost method. The material will pass through the
worms' bodies and become "castings." In about 3-4 months, the worms will have
digested nearly all the garbage and bedding and the bin will be filled with a
rich, black natural fertilizer and soil amendment. Compared to ordinary soil,
the worm castings contain five times more nitrogen, seven times more phosphorus
and 11 times more potassium. They are rich in humic acids and improve the
structure of the soil.
To maintain a separate worm bin for composting food scraps, you need a
watertight container that can be kept somewhere that the temperature will remain
between 50 and 70 degrees F. all year-round.
Ready-made worm bins are available, but you can also make your own.
Red wiggler worms are available in our garden store.
I always suggest a cellar for those who have one. For those not having a cellar,
but living in cooler geographical areas, then any place inside the house on
ground level, such as a garage should work. Unfortunately for the southern
folks, especially those living in the deep south, like Florida, Georgia, Texas,
etc. the possibility of using worms for composting during the summer is unlikely
without a deep cellar. Of course, southerners can utilize red worms prior in the
winter, and have a ready batch of finished castings, or the much valued compost
tea, ready before the growing season is in full bloom, and summer brings the
heat.
If your compost ever exhibits an unpleasant and strong odor, then stop adding new table wastes, until the worms have deteriorated the food that already exists in the worm bin. The problem which causes this odor, is that the food was allowed to sit too long, or the bin contents became to wet. You can assist the worms in the process, by turning the compost to allow for more air. Every few weeks check that the drainage holes are still draining.
If your worms begin to crawl out of the container then its
possible the moisture is not correct. Check that the bedding hasn't gotten too
wet. It's also possible that the bedding may have become too acidic...
especially if you're adding a lot of citrus peels and other acidic foods. You
can help this situation by adding some garden lime, and cutting down on the
acidic table wastes for a time.
Always bury your food in the worm bin. You should also cover the bin, a burlap
sack is perfect for this purpose. If fruit flies become a nuisance, then try
moving the bin to another area.
 Mary
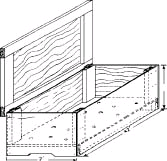
Appelhof's 1-2-3 Portable Worm Bin (1' deep, 2- wide and 3 long).
Mary
Appelhof's 1-2-3 Portable Worm Bin (1' deep, 2- wide and 3 long).
This bin has a bottom so it can be moved and used in a heated garage or basement during cold weather. When a worm box is used outside, it does not need to have a bottom. You may want to line the bottom with rocks or boards to keep rodents and other worm-loving creatures from tunneling in. Wooden boxes will typically last for 2 or 3 years.
Popular Composting Articles
Composting |
Composting Bins | Vermicomposting |
Stealth Composting
Popular Composting Products
Composting |
Compost Accessories |
Compost Pails |
Compost Systems |
Worm Bins
-


Think Four Seasons: When designing your backyard landscape, remember that there are four seasons. You will want flowers and shrubs which bloom during different times of the season, autumn foliage during the fall, and a structure that can withstand the winter.


-
Plan before you dig a water garden. Before you even start to think of digging to put in a water garden, make sure you plan everything in advance. Dimensions, the type of water garden you want to have, how deep it will need to be and if you need any permits to do so. If in doubt, call a professional out to help you. That's why they are there.
-
Get the right supplies for the job. Make sure you always get the exact right supplies you need for the job at hand. Don't skimp on quality when you are landscaping your backyard as you will pay dearly for it in the long run.